Becoming a Hyperledger Aries Developer - Getting Started

You want to start developing with Hyperledger Aries and Aries Cloud Agent Python (ACA-py), but you think the documentation is scattered, and the examples are unclear. Then this guide is for you. We are getting started from step 0. In this step-by-step guide I will explain how to set up your local development environment, run two ACA-py instances that create a connection between them, and issue a credential from one to the other.

VON-network

Before we can issue a credential, we need to create a credential definition, and before we can create a credential definition we need a schema. Both the schema and the credential definition are recorded on a Hyperledger Indy ledger. You can connect ACA-py to an existing hosted ledger, but in this guide we are going to connect to a locally running ledger. The locally running ledger has the advantage that you have full control over what is happening, which makes debugging a lot easier.

The von-network repository makes running a Hyperledger Indy network on your machine a breeze. To run a VON-network on your machine, you need to have the docker and docker-compose command available on your machine.

Make a checkout of VON-network:

1
$ git clone https://github.com/bcgov/von-network

Run the VON-network:

1
2
$ cd von-network
$ ./manage start --logs

This will start 4 Indy nodes and one webserver. It will show the log output of all of them. You can stop watching the logs by pressing Ctrl-C, but it will not stop the nodes and webserver. You can see they are still running by running docker ps. To stop the VON-network, you can run:

1
$ ./manage stop

The VON-network webserver is accessible in your browser on localhost:9000. It should look similar to test.bcovrin.vonx.io.

There are two important things to know about the Indy ledger. First, to connect to a ledger, you need to get its genesis file/transaction. With VON-network you can use the URL to the genesis file directly localhost:9000/genesis. With other ledgers it might work differently. The second thing to know is that to create a schema and credential definition, you need to have a DID registered on the ledger. This is where you can use the “Authenticate a New DID” part for.

With the VON-network running, it is time to set up ACA-py.

ACA-py

There are different ways of running ACA-py. You can run it as a stand-alone application, and you can run it in a docker container.

Stand-alone

ACA-py is a Python application (duh!) that can be run as a command-line application. It is available as a Python package:

1
$ pip3 install aries-cloudagent

Or you can install the latest version from the repository:

1
2
3
4
$ git clone https://github.com/hyperledger/aries-cloudagent-python
$ cd aries-cloudagent-python
$ pip3 install -r requirements.txt -r requirements.dev.txt -r requirements.indy.txt
$ pip3 install --no-cache-dir -e .

Either way, both of them depend on the python3-indy dependency. python3-indy is a client library to communicate with libindy. libindy is an Ubuntu package (written in Rust) which can create and manage a wallet. The wallet will store information like connection records, credential exchange records and the credentials themselves.

On Ubuntu 18.04 you can install libindy using:

1
2
3
4
$ sudo apt-key adv --keyserver keyserver.ubuntu.com --recv-keys 68DB5E88
$ sudo add-apt-repository "deb https://repo.sovrin.org/sdk/deb bionic master"
$ sudo apt-get update
$ sudo apt-get install -y libindy

If the installation of both ACA-py and libindy succeeded, you should be able to run:

 1
 2
 3
 4
 5
 6
 7
 8
 9
10
11
$ aca-py --help
usage: aca-py [-h] [-v] {provision,start} ...

positional arguments:
  {provision,start}
    provision        Provision an agent
    start            Start a new agent process

optional arguments:
  -h, --help         show this help message and exit
  -v, --version      print application version and exit

Docker

If you don’t want to install all of this on your machine, you can also run ACA-py in a docker container. There are ready-made images available at hub.docker.com/r/bcgovimages/aries-cloudagent which contain ACA-py and all the necessary dependencies. You can run it like:

 1
 2
 3
 4
 5
 6
 7
 8
 9
10
11
$ docker run --net=host bcgovimages/aries-cloudagent:py36-1.16-0_0.6.0 --help
usage: aca-py [-h] [-v] {provision,start} ...

positional arguments:
  {provision,start}
    provision        Provision an agent
    start            Start a new agent process

optional arguments:
  -h, --help         show this help message and exit
  -v, --version      print application version and exit

As you can see the commands added to the end are passed directly to ACA-py. The examples I give below assume that you have the aca-py command available, but you can substitute them with docker run --net=host bcgovimages/aries-cloudagent:py36-1.16-0_0.6.0 as well.

Starting two ACA-py instances

In this example I’m going to start two ACA-py instances, one called Alice, the other called Bob. Alice will be acting as an issuer. You can imagine Alice to be a party that will issue you a credential, like a drivers license, a padi certificate, or the credential for your use-case. Bob will be the receiver and holder of the credential. As an end-user you will probably not be running an ACA-py instance to hold the credentials for you, instead you will be using a Wallet App, for example the Trinsic.id app. However, when you are developing locally, it is easier to use an ACA-py instance to do that for you.

What about the demo?

The aries-cloudagent-python repository contains a folder called demo. You can run the demo which demonstrates how two instances can connect, issue a credential, and more. What is the difference between the demo, and the examples I’m showing here?

In the demo, you start a thing they call a “runner”. The runner consists of an “agent” and a “controller”. These terms are all really confusing and don’t help you with understanding what it is. The “agent” in this case, is an instance of ACA-py. The “controller” in this case, it the code that interacts with the HTTP Admin Endpoints of ACA-py. If you take a look at the code you can see that ACA-py is started here:

1
2
3
4
5
6
    def get_process_args(self):
        return list(
            flatten(
                ([PYTHON, "-m", "aries_cloudagent", "start"], self.get_agent_args())
            )
        )

Instead of running ACA-py in the terminal like we are doing here, they use python -m ... to do exactly the same.

The “controller” part is the part that interacts with the Admin Endpoints of ACA-py. For example, you can find the code that calls the endpoint to create an invitation right here:

 1
 2
 3
 4
 5
 6
 7
 8
 9
10
11
12
13
14
15
16
17
18
19
20
   async def get_invite(self, use_did_exchange: bool, auto_accept: bool = True):
        self.connection_id = None
        if use_did_exchange:
            # TODO can mediation be used with DID exchange connections?
            invi_rec = await self.admin_POST(
                "/out-of-band/create-invitation",
                {"handshake_protocols": ["rfc23"]},
                params={"auto_accept": json.dumps(auto_accept)},
            )
        else:
            if self.mediation:
                invi_rec = await self.admin_POST(
                    "/connections/create-invitation",
                    {"mediation_id": self.mediator_request_id},
                    params={"auto_accept": json.dumps(auto_accept)},
                )
            else:
                invi_rec = await self.admin_POST("/connections/create-invitation")

        return invi_rec

To make your life easier, the demo combines the starting of an ACA-py instance, and the controller part and calls it a “runner”. So, whenever you start a runner, ACA-py will be started for you.

In the examples I’m giving below, we are not going to use the demo runners, as that is something you probably want don’t want to run for your application. Instead, we are going to start ACA-py ourselves. The “controller” parts are going to be done using curl commands. That is basically the same as using the Swagger/OpenAPI documentation that comes shipped with ACA-py.

The application you develop, the one that talks to the ACA-py Admin Endpoints, is called a controller. In these examples the controller is just curl commands, but of course you can develop your controller in any language, like Python, JavaScript or Go.

The demo runners make sure that the right command-line parameters are created when ACA-py is started. This means that if you want to run ACA-py yourself, you need to understand which command-line parameters are required, and what they mean.

Starting Alice

Alice is our issuer. The issuer will create a schema, and a credential definition which will be registered in the ledger. For the issuer to be able to register these on the ledger, a public DID is required. A public DID is a DID which is registered on the ledger. ACA-py doesn’t register a DID by itself on the ledger, you need to do that yourself. On the production ledgers, it costs money to register a DID on the ledger. As a holder, you don’t need a public DID.

A DID is derived from a public key. A public key is part of a public-private key pair. The key pair is generated based on a seed value. First, we are going to register a DID on the ledger using a seed.

An example of a seed is: Alice000000000000000000000000001. On a production ledger, a DID will be registered for you, and you will receive the seed value.

You can register the DID based on the seed value using the von-network webserver at localhost:9000 using the “Authenticate a New DID” section. Enter a seed, leave DID empty, and for “Alias” you can use “Alice”.

You can do the same using a curl command:

Alice
1
2
3
4
5
6
7
$ curl -X POST "http://localhost:9000/register" \
-d '{"seed": "Alice000000000000000000000000001", "role": "TRUST_ANCHOR", "alias": "Alice"}'
> {
  "did": "PLEVLDPJQMJvPLyX3LgB6S",
  "seed": "Alice000000000000000000000000001",
  "verkey": "DAwrZwgMwkTVHUQ8ZYAmuvzwprDmX8vFNXzFioxrWpCA"
}

To start ACA-py, you need to provide command-line arguments. Remember that genesis URL [localhost:9000/genesis] mentioned before? This is where we need it. Try to run this command to see if you can get Alice to start:

Alice
 1
 2
 3
 4
 5
 6
 7
 8
 9
10
11
12
13
14
15
16
17
18
19
20
21
22
23
24
25
26
27
28
29
30
31
32
33
34
35
36
37
38
39
40
$ aca-py start \          
--label Alice \
-it http 0.0.0.0 8000 \
-ot http \
--admin 0.0.0.0 11000 \
--admin-insecure-mode \
--genesis-url http://localhost:9000/genesis \
--seed Alice000000000000000000000000001 \
--endpoint http://localhost:8000/ \
--debug-connections \
--auto-provision \
--wallet-type indy \
--wallet-name Alice1 \
--wallet-key secret

::::::::::::::::::::::::::::::::::::::::::::::
:: Alice                                    ::
::                                          ::
::                                          ::
:: Inbound Transports:                      ::
::                                          ::
::   - http://0.0.0.0:8000                  ::
::                                          ::
:: Outbound Transports:                     ::
::                                          ::
::   - http                                 ::
::   - https                                ::
::                                          ::
:: Public DID Information:                  ::
::                                          ::
::   - DID: PLEVLDPJQMJvPLyX3LgB6S          ::
::                                          ::
:: Administration API:                      ::
::                                          ::
::   - http://0.0.0.0:11000                 ::
::                                          ::
::                               ver: 0.6.0 ::
::::::::::::::::::::::::::::::::::::::::::::::

Listening...

Let’s go over the command-line parameters to see what they mean:

  • --label Alice This is the label or name that you give to your instance. It is the name that for example a Wallet App will see when you try to make a connection, or when you receive a credential.
  • -it http 0.0.0.0 8000 and -ot http are the inbound and outbound transport methods that ACA-py uses to communicate to other ACA-py instances. Remember port 8000 here, you need it for endpoint.
  • --admin 0.0.0.0 11000 and --admin-insecure-mode are the parameters that configure how your controller application can communicate with ACA-py. In this case, the Admin Endpoints are available on port 11000, and insecure, meaning there is no authentication required. Go ahead, open localhost:11000. You should see the Swagger docs, and you should see the provided label, in this case Alice. These are the endpoints your controller application will interact with
  • --genesis-url http://localhost:9000/genesis This is the URL to the genesis file. When you create a schema and credential definition, you create transactions in the Indy ledger. To be able to create these transactions, ACA-py needs to know about the genesis transaction, this is common in blockchains and distributed ledgers.
  • --seed Alice000000000000000000000000001 This is the seed value we used to register the DID. This seed value proves that you are the owner of the public DID.
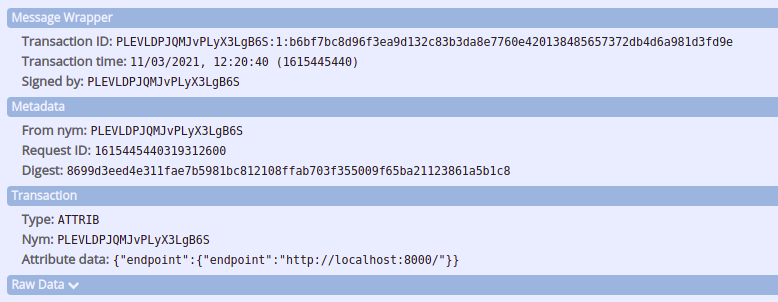
  • --endpoint http://localhost:8000/ This is the URL that ACA-py will send to ledger, to register where the ACA-py instance for your DID can be reached. If you have started aca-py without errors, you should be able to find this endpoint in your von-network webserver. Check localhost:9000/browse/domain, you should see something like:
Alice Endpoint
  • --debug-connections This parameter makes sure that more information about connections is being printed when we start making a connection between Alice and Bob in the next section.
  • --auto-provision This parameter makes sure that ACA-py is going to create a wallet for you when it doesn’t exist. Usually you should create a wallet only once using the aca-py provision command, but that is out of scope for this blog post.
  • --wallet-type indy, --wallet-name Alice and --wallet-key secret are the parameters that are used to create the wallet. In this setup, the wallet is stored in files on your system. You can find the wallets in ~/.indy_client/wallet/. The key is required to write and read to the wallet.

If you start Alice successfully, you can stop it, start it again with the same parameters, and it will just continue where it left off. If you start Alice with a different wallet-name, a new wallet will be created, so you won’t have access to all the previous data stored in the wallet. If you change the seed value here without registering it in the ledger first, you will be greeted with and error like:

1
Ledger rejected transaction request: client request invalid: could not authenticate, verkey for xxxx cannot be found

Starting Bob

We can start Bob the same way we did with Alice. However, Bob is going to be our holder. Bob is not going to create a schema or a credential definition, so he does not require a public DID. In fact, if you use a wallet app, you will not have a public DID at all. Remember it costs money to register a DID? This means only the issuer is paying for the registration of its DID, not the holder.

Bob does not need a public DID, so we are not going to register a DID on the ledger. This means our command-parameters change a bit. Open another terminal and run:

Bob
 1
 2
 3
 4
 5
 6
 7
 8
 9
10
11
12
13
14
15
16
17
18
19
20
21
22
23
24
25
26
27
28
29
30
31
32
33
34
35
36
$ aca-py start \
  --label Bob \
  -it http 0.0.0.0 8001 \
  -ot http \
  --admin 0.0.0.0 11001 \
  --admin-insecure-mode \
  --endpoint http://localhost:8001/ \
  --genesis-url http://localhost:9000/genesis \
  --debug-connections \
  --auto-provision \
  --wallet-local-did \
  --wallet-type indy \
  --wallet-name Bob1 \
  --wallet-key secret

::::::::::::::::::::::::::::::::::::::::::::::
:: Bob                                      ::
::                                          ::
::                                          ::
:: Inbound Transports:                      ::
::                                          ::
::   - http://0.0.0.0:8001                  ::
::                                          ::
:: Outbound Transports:                     ::
::                                          ::
::   - http                                 ::
::   - https                                ::
::                                          ::
:: Administration API:                      ::
::                                          ::
::   - http://0.0.0.0:11001                 ::
::                                          ::
::                               ver: 0.6.0 ::
::::::::::::::::::::::::::::::::::::::::::::::

Listening...

There is one new parameter: --wallet-local-did. Bob doesn’t have a public DID, but he does need a local DID. The local DID will be used for Alice to create a credential for, more on that later.

The Bob ACA-py instance also has an Admin API, you access it localhost:11001.

You should now have two ACA-py instances running next to each other. One for Alice (the issuer), and one for Bob (the holder). With the two agents running, it is time to play the controller for both of them!

Connecting

Let’s go through the steps of connecting Alice and Bob.

1 
Alice creates an invitation

Alice can create an invitation like:

Alice
 1
 2
 3
 4
 5
 6
 7
 8
 9
10
11
12
13
14
15
16
17
18
19
20
21
22
23
24
25
26
27
28
29
30
31
32
$ curl -X POST "http://localhost:11000/out-of-band/create-invitation" \
   -H 'Content-Type: application/json' \
   -d '{
  "handshake_protocols": [
    "did:sov:BzCbsNYhMrjHiqZDTUASHg;spec/didexchange/1.0"
  ],
  "use_public_did": false
}'
> {
  "invitation": {
    "@type": "did:sov:BzCbsNYhMrjHiqZDTUASHg;spec/out-of-band/1.0/invitation",
    "@id": "e20d3d8f-8958-4201-89eb-e74d28b5806a",
    "handshake_protocols": [
      "did:sov:BzCbsNYhMrjHiqZDTUASHg;spec/didexchange/1.0"
    ],
    "label": "Alice",
    "service": [
      {
        "id": "#inline",
        "type": "did-communication",
        "recipientKeys": [
          "did:​key:z6MkecMK1KjwHv9W7SvF3jhzBzhkAiuYHqADzvAKHu2wS6E6"
        ],
        "serviceEndpoint": "http://localhost:8000/"
      }
    ]
  },
  "trace": false,
  "invi_msg_id": "e20d3d8f-8958-4201-89eb-e74d28b5806a",
  "invitation_url": "http://localhost:8000/?oob=eyJAdHl...",
  "state": "initial"
}

The field use_public_did signifies that the public DID will be used in invites, more on that in the tip below.

 Public vs non-public invites

A public invites contains a DID for other agents to connect with. For a public invite, the ledger needs to know at which endpoint an agent can be reached. This means that it requires a lookup in the ledger by the invited agent. A non-public invite does not use a public DID, instead it contains a service endpoint url, so the invited agent can connect to inviter directly.

Example of a public invite:

 1
 2
 3
 4
 5
 6
 7
 8
 9
10
11
{
  "@type": "did:sov:BzCbsNYhMrjHiqZDTUASHg;spec/out-of-band/1.0/invitation",
  "@id": "c927b4a7-1901-433e-ac3f-16158431fd0a",
  "handshake_protocols": [
    "did:sov:BzCbsNYhMrjHiqZDTUASHg;spec/didexchange/1.0"
  ],
  "label": "Alice",
  "service": [
    "did:sov:UpFt248WuA5djSFThNjBhq"
  ]
}

Example of a non-public invite:

 1
 2
 3
 4
 5
 6
 7
 8
 9
10
11
12
13
14
15
16
17
18
{
  "@type": "did:sov:BzCbsNYhMrjHiqZDTUASHg;spec/out-of-band/1.0/invitation",
  "@id": "e20d3d8f-8958-4201-89eb-e74d28b5806a",
  "handshake_protocols": [
    "did:sov:BzCbsNYhMrjHiqZDTUASHg;spec/didexchange/1.0"
  ],
  "label": "Alice",
  "service": [
    {
      "id": "#inline",
      "type": "did-communication",
      "recipientKeys": [
        "did:​key:z6MkecMK1KjwHv9W7SvF3jhzBzhkAiuYHqADzvAKHu2wS6E6"
      ],
      "serviceEndpoint": "http://localhost:8000/"
    }
  ]
}

The serviceEndpoint has the value that you have set with --endpoint.

When Alice creates the invitation, the ACA-py instance will log that it has created an invitation:

Alice
1
2
3
4
5
Created new connection
    connection: {'routing_state': 'none', 'invitation_key': 'b4eygXuTvzdSv1XK3ZwQtzdB8t79gcC2W46uDUz45XC', 'accept': 'manual', 'updated_at': '2021-03-11 08:01:16.546248Z', 'created_at': '2021-03-11 08:01:16.546248Z', 'connection_id': '9ebac177-a3d4-4a74-be42-82f4e0cafefa', 'state': 'invitation', 'invitation_mode': 'once', 'their_role': 'invitee', 'rfc23_state': 'invitation-sent'}

Added Invitation
    connection: {'routing_state': 'none', 'invitation_key': 'b4eygXuTvzdSv1XK3ZwQtzdB8t79gcC2W46uDUz45XC', 'accept': 'manual', 'updated_at': '2021-03-11 08:01:16.550301Z', 'created_at': '2021-03-11 08:01:16.546248Z', 'connection_id': '9ebac177-a3d4-4a74-be42-82f4e0cafefa', 'invitation_msg_id': '638728b4-63b1-4a9a-82b8-c07d72925196', 'state': 'invitation', 'invitation_mode': 'once', 'their_role': 'invitee', 'rfc23_state': 'invitation-sent'}
2 
Bob receives the invitation

The invitation that Bob needs to receive, is the invitation object in the response of the call to /out-of-band/create-invitation that Alice made. Bob can receive this invitation like:

Bob
 1
 2
 3
 4
 5
 6
 7
 8
 9
10
11
12
13
14
15
16
17
18
19
20
21
22
23
24
25
26
27
28
29
30
31
32
33
34
$ curl -X POST "http://localhost:11001/out-of-band/receive-invitation" \
   -H 'Content-Type: application/json' \
   -d '{
  "@type": "did:sov:BzCbsNYhMrjHiqZDTUASHg;spec/out-of-band/1.0/invitation",
  "@id": "638728b4-63b1-4a9a-82b8-c07d72925196",
  "label": "Alice",
  "handshake_protocols": [
    "did:sov:BzCbsNYhMrjHiqZDTUASHg;spec/didexchange/1.0"
  ],
  "service": [
    {
      "id": "#inline",
      "type": "did-communication",
      "recipientKeys": [
        "did:​key:z6Mkf3KhZvnLoUV6ZQrDzcXnFzYczi9xZZrYiWy2jVSzyJJa"
      ],
      "serviceEndpoint": "http://localhost:8000/"
    }
  ]
}'
> {
  "created_at": "2021-03-11 08:02:52.641290Z",
  "state": "invitation",
  "updated_at": "2021-03-11 08:02:52.641290Z",
  "their_role": "inviter",
  "invitation_msg_id": "638728b4-63b1-4a9a-82b8-c07d72925196",
  "accept": "manual",
  "connection_id": "6c770a37-64ad-43f4-99c6-12c467c58dba",
  "invitation_mode": "once",
  "routing_state": "none",
  "invitation_key": "b4eygXuTvzdSv1XK3ZwQtzdB8t79gcC2W46uDUz45XC",
  "rfc23_state": "invitation-received",
  "their_label": "Alice"
}

If you run two ACA-py instances next to each other you can just copy and paste the invitation. In the real world the invitation of Alice will usually go to Bob either as a QR-code or as link. The wallet app of Bob will scan the QR-code, thereby receiving the invitation.

When Bob receives the invitation, the ACA-py instance will log it:

Bob
1
2
3
4
Created new connection record from invitation
    connection: {'created_at': '2021-03-11 08:02:52.641290Z', 'state': 'invitation', 'updated_at': '2021-03-11 08:02:52.641290Z', 'their_role': 'inviter', 'invitation_msg_id': '638728b4-63b1-4a9a-82b8-c07d72925196', 'accept': 'manual', 'connection_id': '6c770a37-64ad-43f4-99c6-12c467c58dba', 'invitation_mode': 'once', 'routing_state': 'none', 'invitation_key': 'b4eygXuTvzdSv1XK3ZwQtzdB8t79gcC2W46uDUz45XC', 'rfc23_state': 'invitation-received', 'their_label': 'Alice'}
    invitation: <InvitationMessage(_message_id='638728b4-63b1-4a9a-82b8-c07d72925196', _message_new_id=False, _message_decorators=<DecoratorSet{}>, label='Alice', handshake_protocols=['did:sov:BzCbsNYhMrjHiqZDTUASHg;spec/didexchange/1.0'], request_attach=[], service_blocks=[<Service(_id='#inline', _type='did-communication', did=None, recipient_keys=['did:​key:z6Mkf3KhZvnLoUV6ZQrDzcXnFzYczi9xZZrYiWy2jVSzyJJa'], routing_keys=[], service_endpoint='http://localhost:8000/')>], service_dids=[])>
    their_role: responder
3 
Bob accepts the invitation

Now that Bob as received the invitation, he can accept the invitation. For that, he needs the connection_id from the response of /out-of-band/receive-invitation which in this case is 6c770a37-64ad-43f4-99c6-12c467c58dba, but it will be different for you.

Bob
 1
 2
 3
 4
 5
 6
 7
 8
 9
10
11
12
13
14
15
16
17
$ curl -X POST "http://localhost:11001/didexchange/6c770a37-64ad-43f4-99c6-12c467c58dba/accept-invitation" -H 'Content-Type: application/json'
> {
  "created_at": "2021-03-11 08:02:52.641290Z",
  "state": "request",
  "updated_at": "2021-03-11 08:03:52.760366Z",
  "their_role": "inviter",
  "invitation_msg_id": "638728b4-63b1-4a9a-82b8-c07d72925196",
  "accept": "manual",
  "connection_id": "6c770a37-64ad-43f4-99c6-12c467c58dba",
  "request_id": "e598b0dc-9582-4979-9104-00c35ebf2c32",
  "invitation_mode": "once",
  "routing_state": "none",
  "invitation_key": "b4eygXuTvzdSv1XK3ZwQtzdB8t79gcC2W46uDUz45XC",
  "my_did": "HzWWzUg5hnjycPCAm8ko2X",
  "rfc23_state": "request-sent",
  "their_label": "Alice"
}

Bob’s ACA-py will log this as

Bob
1
2
Created connection request
    connection: {'created_at': '2021-03-11 08:02:52.641290Z', 'state': 'request', 'updated_at': '2021-03-11 08:03:52.760366Z', 'their_role': 'inviter', 'invitation_msg_id': '638728b4-63b1-4a9a-82b8-c07d72925196', 'accept': 'manual', 'connection_id': '6c770a37-64ad-43f4-99c6-12c467c58dba', 'request_id': 'e598b0dc-9582-4979-9104-00c35ebf2c32', 'invitation_mode': 'once', 'routing_state': 'none', 'invitation_key': 'b4eygXuTvzdSv1XK3ZwQtzdB8t79gcC2W46uDUz45XC', 'my_did': 'HzWWzUg5hnjycPCAm8ko2X', 'rfc23_state': 'request-sent', 'their_label': 'Alice'}

Alice should have received the connection request, which will be logged as:

Alice
1
2
3
4
5
Receiving connection request
    request: <DIDXRequest(_message_id='e598b0dc-9582-4979-9104-00c35ebf2c32', _message_new_id=False, _message_decorators=<DecoratorSet{~thread: <ThreadDecorator(_thid='e598b0dc-9582-4979-9104-00c35ebf2c32', _pthid='638728b4-63b1-4a9a-82b8-c07d72925196', _sender_order=None, _received_orders=None)>}>, label='Bob', did='HzWWzUg5hnjycPCAm8ko2X', did_doc_attach=<AttachDecorator(ident='d3efe703-8481-48be-b51f-f18c711f85b0', description=None, filename=None, mime_type='application/json', lastmod_time=None, byte_count=None, data=<AttachDecoratorData(jws_=<AttachDecoratorDataJWS(header=<AttachDecoratorDataJWSHeader(kid='did:​key:z2DZgCif2hhPXp9FyYKRDx94VZGTrtoFzXMQVZiQyb71qFz')>, protected='eyJhbGciOiAiRWREU0EiLCAia2lkIjogImRpZDprZXk6ejJEWmdDaWYyaGhQWHA5RnlZS1JEeDk0VlpHVHJ0b0Z6WE1RVlppUXliNzFxRnoiLCAiandrIjogeyJrdHkiOiAiT0tQIiwgImNydiI6ICJFZDI1NTE5IiwgIngiOiAiaVpuTjB2ZWhoSFlFdjh1cEVzeEVPTE1zdjUyanc1ZnFHOGRzdnZaeUtFVSIsICJraWQiOiAiZGlkOmtleTp6MkRaZ0NpZjJoaFBYcDlGeVlLUkR4OTRWWkdUcnRvRnpYTVFWWmlReWI3MXFGeiJ9fQ', signature='SI5Rc-0pjCclpQbeSnjqKFALoG4q296xDkZN8rW0dOc1dClQDDM_UlYMAaHaAP00yp-Rp-5yC6HnOb4Q4_WAAw', signatures=None)>, base64_='eyJAY29udGV4dCI6ICJodHRwczovL3czaWQub3JnL2RpZC92MSIsICJpZCI6ICJkaWQ6c292Okh6V1d6VWc1aG5qeWNQQ0FtOGtvMlgiLCAicHVibGljS2V5IjogW3siaWQiOiAiZGlkOnNvdjpIeldXelVnNWhuanljUENBbThrbzJYIzEiLCAidHlwZSI6ICJFZDI1NTE5VmVyaWZpY2F0aW9uS2V5MjAxOCIsICJjb250cm9sbGVyIjogImRpZDpzb3Y6SHpXV3pVZzVobmp5Y1BDQW04a28yWCIsICJwdWJsaWNLZXlCYXNlNTgiOiAiQUc4dDI1WVhFTTQyNVJ4S2Fkc3REQlRmRXBQQ2hmbnduUlZlUmZQQ2Q1dmMifV0sICJhdXRoZW50aWNhdGlvbiI6IFt7InR5cGUiOiAiRWQyNTUxOVNpZ25hdHVyZUF1dGhlbnRpY2F0aW9uMjAxOCIsICJwdWJsaWNLZXkiOiAiZGlkOnNvdjpIeldXelVnNWhuanljUENBbThrbzJYIzEifV0sICJzZXJ2aWNlIjogW3siaWQiOiAiZGlkOnNvdjpIeldXelVnNWhuanljUENBbThrbzJYO2luZHkiLCAidHlwZSI6ICJJbmR5QWdlbnQiLCAicHJpb3JpdHkiOiAwLCAicmVjaXBpZW50S2V5cyI6IFsiQUc4dDI1WVhFTTQyNVJ4S2Fkc3REQlRmRXBQQ2hmbnduUlZlUmZQQ2Q1dmMiXSwgInNlcnZpY2VFbmRwb2ludCI6ICJodHRwOi8vbG9jYWxob3N0OjgwMDEvIn1dfQ==')>)>)>

Received connection request from invitation
    connection: {'their_did': 'HzWWzUg5hnjycPCAm8ko2X', 'their_label': 'Bob', 'routing_state': 'none', 'invitation_key': 'b4eygXuTvzdSv1XK3ZwQtzdB8t79gcC2W46uDUz45XC', 'accept': 'manual', 'updated_at': '2021-03-11 08:03:52.794628Z', 'created_at': '2021-03-11 08:01:16.546248Z', 'request_id': 'e598b0dc-9582-4979-9104-00c35ebf2c32', 'connection_id': '9ebac177-a3d4-4a74-be42-82f4e0cafefa', 'invitation_msg_id': '638728b4-63b1-4a9a-82b8-c07d72925196', 'state': 'request', 'invitation_mode': 'once', 'their_role': 'invitee', 'rfc23_state': 'request-received'}

By accepting the invitation, Bob sends a connection request to Alice. This happens automatically when Bob accepts the invitation. The request will directly go from Bob’s ACA-py instance to Alice’s ACA-py instance.

Even though Alice started this interaction by creating an invitation, it is actually Bob that sends a connection request to Alice, therefore Bob is called the requester. Alice is called the responder.

Alice automatically receives the connection request.

4 
Alice accepts the connection request

Alice can now accept Bob’s connection request. For this she needs the connection_id for the connection for her side. In this case that is 9ebac177-a3d4-4a74-be42-82f4e0cafefa. Note that the connection_id is different for both Alice and Bob. They both create their own unique identifier for the connection.

Alice accepts the request:

Alice
 1
 2
 3
 4
 5
 6
 7
 8
 9
10
11
12
13
14
15
16
17
18
$ curl -X POST "http://localhost:11000/didexchange/9ebac177-a3d4-4a74-be42-82f4e0cafefa/accept-request" -H 'Content-Type: application/json'
> {
  "their_did": "HzWWzUg5hnjycPCAm8ko2X",
  "their_label": "Bob",
  "my_did": "D8mvHXoPsYE17ma3KgTRre",
  "routing_state": "none",
  "invitation_key": "b4eygXuTvzdSv1XK3ZwQtzdB8t79gcC2W46uDUz45XC",
  "accept": "manual",
  "updated_at": "2021-03-11 08:10:19.754596Z",
  "created_at": "2021-03-11 08:01:16.546248Z",
  "request_id": "e598b0dc-9582-4979-9104-00c35ebf2c32",
  "connection_id": "9ebac177-a3d4-4a74-be42-82f4e0cafefa",
  "invitation_msg_id": "638728b4-63b1-4a9a-82b8-c07d72925196",
  "state": "response",
  "invitation_mode": "once",
  "their_role": "invitee",
  "rfc23_state": "response-sent"
}

Alice’s ACA-py will log this like:

Alice
 1
 2
 3
 4
 5
 6
 7
 8
 9
10
11
12
Creating connection response
    connection_id: 9ebac177-a3d4-4a74-be42-82f4e0cafefa

Created connection response
    connection: {'their_did': 'HzWWzUg5hnjycPCAm8ko2X', 'their_label': 'Bob', 'my_did': 'D8mvHXoPsYE17ma3KgTRre', 'routing_state': 'none', 'invitation_key': 'b4eygXuTvzdSv1XK3ZwQtzdB8t79gcC2W46uDUz45XC', 'accept': 'manual', 'updated_at': '2021-03-11 08:10:19.754596Z', 'created_at': '2021-03-11 08:01:16.546248Z', 'request_id': 'e598b0dc-9582-4979-9104-00c35ebf2c32', 'connection_id': '9ebac177-a3d4-4a74-be42-82f4e0cafefa', 'invitation_msg_id': '638728b4-63b1-4a9a-82b8-c07d72925196', 'state': 'response', 'invitation_mode': 'once', 'their_role': 'invitee', 'rfc23_state': 'response-sent'}
    response: <DIDXResponse(_message_id='fefe7737-ec1d-446d-b4e6-20c52b435a9e', _message_new_id=True, _message_decorators=<DecoratorSet{~thread: <ThreadDecorator(_thid='e598b0dc-9582-4979-9104-00c35ebf2c32', _pthid='638728b4-63b1-4a9a-82b8-c07d72925196', _sender_order=None, _received_orders=None)>}>, did='D8mvHXoPsYE17ma3KgTRre', did_doc_attach=<AttachDecorator(ident='141275af-d404-475c-9183-6807cd9f8688', description=None, filename=None, mime_type='application/json', lastmod_time=None, byte_count=None, data=<AttachDecoratorData(base64_='eyJAY29udGV4dCI6ICJodHRwczovL3czaWQub3JnL2RpZC92MSIsICJpZCI6ICJkaWQ6c292OkQ4bXZIWG9Qc1lFMTdtYTNLZ1RScmUiLCAicHVibGljS2V5IjogW3siaWQiOiAiZGlkOnNvdjpEOG12SFhvUHNZRTE3bWEzS2dUUnJlIzEiLCAidHlwZSI6ICJFZDI1NTE5VmVyaWZpY2F0aW9uS2V5MjAxOCIsICJjb250cm9sbGVyIjogImRpZDpzb3Y6RDhtdkhYb1BzWUUxN21hM0tnVFJyZSIsICJwdWJsaWNLZXlCYXNlNTgiOiAiN2NhaFZTM1p5M3NCQUR4elMxZHJ1aEd4TFBzTXNYYXpoUVdBUTJTVmJORjcifV0sICJhdXRoZW50aWNhdGlvbiI6IFt7InR5cGUiOiAiRWQyNTUxOVNpZ25hdHVyZUF1dGhlbnRpY2F0aW9uMjAxOCIsICJwdWJsaWNLZXkiOiAiZGlkOnNvdjpEOG12SFhvUHNZRTE3bWEzS2dUUnJlIzEifV0sICJzZXJ2aWNlIjogW3siaWQiOiAiZGlkOnNvdjpEOG12SFhvUHNZRTE3bWEzS2dUUnJlO2luZHkiLCAidHlwZSI6ICJJbmR5QWdlbnQiLCAicHJpb3JpdHkiOiAwLCAicmVjaXBpZW50S2V5cyI6IFsiN2NhaFZTM1p5M3NCQUR4elMxZHJ1aEd4TFBzTXNYYXpoUVdBUTJTVmJORjciXSwgInNlcnZpY2VFbmRwb2ludCI6ICJodHRwOi8vbG9jYWxob3N0OjgwMDAvIn1dfQ==', jws_=<AttachDecoratorDataJWS(header=<AttachDecoratorDataJWSHeader(kid='did:​key:z2DR18Vcdh5d7kkdTbX9deCGD6EQBPhi1Lbea8AtXgtSpra')>, protected='eyJhbGciOiAiRWREU0EiLCAia2lkIjogImRpZDprZXk6ejJEUjE4VmNkaDVkN2trZFRiWDlkZUNHRDZFUUJQaGkxTGJlYThBdFhndFNwcmEiLCAiandrIjogeyJrdHkiOiAiT0tQIiwgImNydiI6ICJFZDI1NTE5IiwgIngiOiAiQ0xuaFJvQzFQWUM1WWJ0NTBuYkZ5MnZpNVUtVlpuS2pNOWx3U2RUQVprOCIsICJraWQiOiAiZGlkOmtleTp6MkRSMThWY2RoNWQ3a2tkVGJYOWRlQ0dENkVRQlBoaTFMYmVhOEF0WGd0U3ByYSJ9fQ', signature='DwBrn7ecFD8xVnUgJPOP_m_p1mU23aguLMv3qXjRJGxp-Q2dN6sGFse6b1rY1l_5XjmDiiSiEKYmaX92SYuRBQ', signatures=None)>)>)>)>

Connection promoted to active
    connection: {'their_did': 'HzWWzUg5hnjycPCAm8ko2X', 'their_label': 'Bob', 'my_did': 'D8mvHXoPsYE17ma3KgTRre', 'routing_state': 'none', 'invitation_key': 'b4eygXuTvzdSv1XK3ZwQtzdB8t79gcC2W46uDUz45XC', 'accept': 'manual', 'updated_at': '2021-03-11 08:10:19.808614Z', 'created_at': '2021-03-11 08:01:16.546248Z', 'request_id': 'e598b0dc-9582-4979-9104-00c35ebf2c32', 'connection_id': '9ebac177-a3d4-4a74-be42-82f4e0cafefa', 'invitation_msg_id': '638728b4-63b1-4a9a-82b8-c07d72925196', 'state': 'active', 'invitation_mode': 'once', 'their_role': 'invitee', 'rfc23_state': 'completed'}

Received connection complete
    connection: {'their_did': 'HzWWzUg5hnjycPCAm8ko2X', 'their_label': 'Bob', 'my_did': 'D8mvHXoPsYE17ma3KgTRre', 'routing_state': 'none', 'invitation_key': 'b4eygXuTvzdSv1XK3ZwQtzdB8t79gcC2W46uDUz45XC', 'accept': 'manual', 'updated_at': '2021-03-11 08:10:19.814402Z', 'created_at': '2021-03-11 08:01:16.546248Z', 'request_id': 'e598b0dc-9582-4979-9104-00c35ebf2c32', 'connection_id': '9ebac177-a3d4-4a74-be42-82f4e0cafefa', 'invitation_msg_id': '638728b4-63b1-4a9a-82b8-c07d72925196', 'state': 'completed', 'invitation_mode': 'once', 'their_role': 'invitee', 'rfc23_state': 'completed'}

Bob’s ACA-py will log this as:

Bob
1
2
3
4
5
Accepted connection response
    connection: {'created_at': '2021-03-11 08:02:52.641290Z', 'state': 'response', 'updated_at': '2021-03-11 08:10:19.783479Z', 'their_role': 'inviter', 'invitation_msg_id': '638728b4-63b1-4a9a-82b8-c07d72925196', 'accept': 'manual', 'connection_id': '6c770a37-64ad-43f4-99c6-12c467c58dba', 'request_id': 'e598b0dc-9582-4979-9104-00c35ebf2c32', 'invitation_mode': 'once', 'routing_state': 'none', 'their_did': 'D8mvHXoPsYE17ma3KgTRre', 'invitation_key': 'b4eygXuTvzdSv1XK3ZwQtzdB8t79gcC2W46uDUz45XC', 'my_did': 'HzWWzUg5hnjycPCAm8ko2X', 'rfc23_state': 'response-received', 'their_label': 'Alice'}

Sent connection complete
    connection: {'created_at': '2021-03-11 08:02:52.641290Z', 'state': 'completed', 'updated_at': '2021-03-11 08:10:19.795287Z', 'their_role': 'inviter', 'invitation_msg_id': '638728b4-63b1-4a9a-82b8-c07d72925196', 'accept': 'manual', 'connection_id': '6c770a37-64ad-43f4-99c6-12c467c58dba', 'request_id': 'e598b0dc-9582-4979-9104-00c35ebf2c32', 'invitation_mode': 'once', 'routing_state': 'none', 'their_did': 'D8mvHXoPsYE17ma3KgTRre', 'invitation_key': 'b4eygXuTvzdSv1XK3ZwQtzdB8t79gcC2W46uDUz45XC', 'my_did': 'HzWWzUg5hnjycPCAm8ko2X', 'rfc23_state': 'completed', 'their_label': 'Alice'}

Congratulations! A connection has been made between Alice and Bob. You can now take a break, don’t forget to hydrate.

Automatic accepting

ACA-py support command line options to automatically accept invites and requests when they come in. This allows you to skip step 3 and 4. The command line flags are --auto-accept-invites and --auto-accept-requests.

Creating a schema and credential definition

Alice will be issuing a credential to Bob. Before she can do that she needs to create a schema and a credential definition.

Creating a schema is straight-forward by posting to the /schemas endpoint:

Alice
 1
 2
 3
 4
 5
 6
 7
 8
 9
10
11
12
13
14
15
16
17
18
19
20
21
22
23
24
$ curl -X POST http://localhost:11000/schemas \
  -H 'Content-Type: application/json' \
  -d '{
    "attributes": [
      "name",
      "age"
    ],
    "schema_name": "my-schema",
    "schema_version": "1.0"
}'
> {
  "schema_id": "M6HJ1MQHKr98nuxobuzJJg:2:my-schema:1.0",
  "schema": {
    "ver": "1.0",
    "id": "M6HJ1MQHKr98nuxobuzJJg:2:my-schema:1.0",
    "name": "my-schema",
    "version": "1.0",
    "attrNames": [
      "name",
      "age"
    ],
    "seqNo": 1006
  }
}

Now let’s create a credential definition based upon the just created schema:

Alice
1
2
3
4
5
6
7
$ curl -X POST http://localhost:11000/credential-definitions \
  -H 'Content-Type: application/json' \
  -d '{
    "schema_id": "M6HJ1MQHKr98nuxobuzJJg:2:my-schema:1.0",
    "tag": "default"
  }'
> {"credential_definition_id": "M6HJ1MQHKr98nuxobuzJJg:3:CL:1006:default"}

The Issue Credential dance

Just as with a tango, there are two parties involved when issuing a credential. There is the issuer (Alice) and the holder (Bob.

There are three flows for issuing credentials, based on which party (issuer, holder) initiates the dance and with what. When you, as a holder, start the dance, you start with sending a proposal to the issuer (step 1). The proposal contains what you would like to receive from the issuer. Based on that the issuer can send an offer to the holder. When the issuer starts the dance, it starts with sending an offer to the holder (step 2). The holder can also start by directly sending a request to the issuer, thereby skipping the proposal and offer steps.

The flow for issuing credentials is:

  1. Holder sends a proposal to the issuer (issuer receives proposal)
  2. Issuer sends an offer to the holder based on the proposal (holder receives offer)
  3. Holder sends a request to the issuer (issuer receives request)
  4. Issuer sends credential to holder (holder receives credentials)
  5. Holder stores credential (holder sends acknowledge to issuer)
  6. Issuer receives acknowledge

Issuing a credential

1 
Bob starts with sending a proposal

When Bob starts with sending a proposal, he can use the /issue-credential-2.0/send-proposal endpoint. Note here that Bob uses the connection_id of his connection with Alice. The proposal is sent over the connection that has just been established.

Bob
 1
 2
 3
 4
 5
 6
 7
 8
 9
10
11
12
13
14
15
16
17
18
19
20
21
22
23
24
25
26
27
28
29
30
31
32
33
34
35
36
37
38
39
40
41
42
43
44
45
46
47
48
49
50
51
52
53
54
55
56
57
58
59
60
61
62
63
64
65
66
67
68
69
70
71
72
73
74
75
76
77
78
79
80
81
82
83
84
85
86
$ curl -X POST http://localhost:11001/issue-credential-2.0/send-proposal \
 -H "Content-Type: application/json" -d '{
  "comment": "I want this",
  "connection_id": "6c770a37-64ad-43f4-99c6-12c467c58dba",
  "credential_preview": {
    "@type": "issue-credential/2.0/credential-preview",
    "attributes": [
      {
        "mime-type": "plain/text",
        "name": "name", 
        "value": "Bob"
      },
      {
        "mime-type": "plain/text",
        "name": "age", 
        "value": "30"
      }
    ]
  },
  "filter": {
    "dif": {},
    "indy": {}
  }
}'
> {
  "role": "holder",
  "auto_offer": false,
  "auto_issue": false,
  "auto_remove": true,
  "cred_preview": {
    "@type": "did:sov:BzCbsNYhMrjHiqZDTUASHg;spec/issue-credential/2.0/credential-preview",
    "attributes": [
      {
        "name": "name",
        "value": "Bob"
      }
    ]
  },
  "cred_ex_id": "0ea86878-4369-41e8-8212-e4af42304f3d",
  "conn_id": "6c770a37-64ad-43f4-99c6-12c467c58dba",
  "state": "proposal-sent",
  "updated_at": "2021-02-24 06:13:35.921424Z",
  "created_at": "2021-02-24 06:13:35.921424Z",
  "initiator": "self",
  "cred_proposal": {
    "@type": "did:sov:BzCbsNYhMrjHiqZDTUASHg;spec/issue-credential/2.0/propose-credential",
    "@id": "d263c3a9-95b7-42ce-bfce-58d10b256809",
    "comment": "I want this",
    "filters~attach": [
      {
        "@id": "0",
        "mime-type": "application/json",
        "data": {
          "base64": "e30="
        }
      },
      {
        "@id": "1",
        "mime-type": "application/json",
        "data": {
          "base64": "e30="
        }
      }
    ],
    "credential_preview": {
      "@type": "did:sov:BzCbsNYhMrjHiqZDTUASHg;spec/issue-credential/2.0/credential-preview",
      "attributes": [
        {
          "name": "name",
          "value": "Bob"
        }
      ]
    },
    "formats": [
      {
        "attach_id": "0",
        "format": "dif/credential-manifest@v1.0"
      },
      {
        "attach_id": "1",
        "format": "hlindy-zkp-v1.0"
      }
    ]
  },
  "thread_id": "d263c3a9-95b7-42ce-bfce-58d10b256809"
}

The result you get back is a Credential Exchange Record. It is a record that contains the state of the credential dance. These records are stored in ACA-py and can be retrieved using the /issue-credentials-2.0/records/{id} endpoint where the id is the cred_ex_id in the result.

2 
Alice responds with an offer

Alice receives the proposal and can respond with an offer using the /issue-credential-2.0/records/{id}/send-offer endpoint. Note here that the id that the issuer uses is different from the cred_ex_id that the holder got. Each ACA-py instance creates its own identifiers.

Alice
1
2
3
$ curl -X POST http://localhost:11000/issue-credential-2.0/records/bac31f8c-660d-4ac4-b9a1-4ed7de47746a/send-offer \
 -H "Content-Type: application/json"
> { <Credential Exchange Record> }
2 
Bob requests the credential

After the offer has been received by the Bob, he can send a request for a credential to Alice.

Bob
1
2
$ curl -X POST http://localhost:11001/issue-credential-2.0/records/0ea86878-4369-41e8-8212-e4af42304f3d/send-request
> { <Credential Exchange Record> }
3 
Alice issues the credential
Alice
1
2
3
$ curl -X POST http://localhost:11000/issue-credential-2.0/records/bac31f8c-660d-4ac4-b9a1-4ed7de47746a/issue \
  -H "Content-Type: application/json" -d '{"comment": "Please have this"}'
> { <Credential Exchange Record> }
4 
Bob stores the received credential
Bob
1
2
3
$ curl -X POST http://localhost:11001/issue-credential-2.0/records/0ea86878-4369-41e8-8212-e4af42304f3d/store \
  -H "Content-Type: application/json" -d '{}'
> { <Credential Exchange Record> }

Automating the issue credential flow

There is one last endpoint that we haven’t discussed, which is /issue-credential-2.0/send. Which is the same as /issue-credential-2.0/send-offer from the issuer viewpoint, but which sets the flag auto_offer and auto_issue to true. If the holder automatically accepts offers and turns them into requests, then this would completely automate the issuing of credentials.

Development and debugging

For development purposes you can automate a large part of the flow. To make debugging easier, you can provide --debug-credentials to ACA-py which will log information in the console.

The flow of issuing credentials can be automated using:

  • --auto-respond-credential-proposal
  • --auto-respond-credential-offer
  • --auto-respond-credential-request
  • --auto-store-credential

If you have read this blog post so far, then these command line options should speak for themselves. Of course these are for development and debugging, so never enable these for production usage.

When you create a credential proposal or a credential offer, the credential exchange record will be automatically removed after the issuing of the credential has completed. The automatic removal can be disabled by providing --preserve-exchange-records to ACA-py.

Conclusion

These steps should get you through the process of starting instances, creating a connection between them, and issuing a credential. You can find more details about creating a connection in here, and more details about issuing credentials here.

Please let me know if this guide was useful and if you have any questions!