Building an ACA-py Controller: Architecture

In this series I will be building an ACA-py controller in Go which uses my go-acapy-client. The controller will be able to create connections and issue credentials. You can find the code for this project at github.com/ldej/issuer
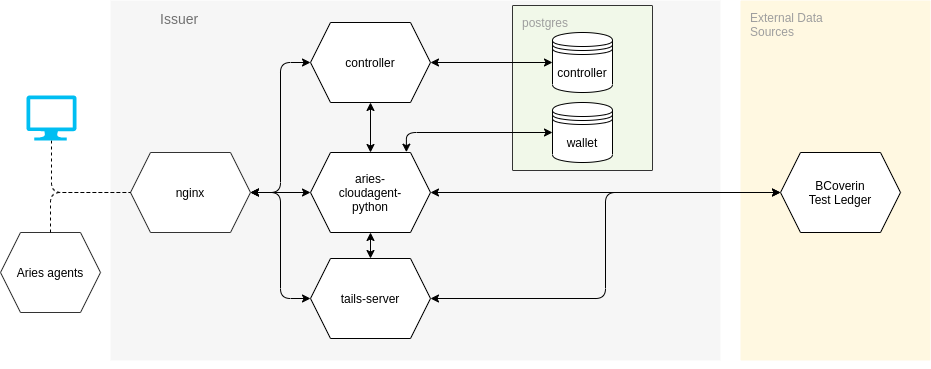
Issuer Architecture

The architecture for the issuer consists of four services: ACA-py, tails-server, postgres and the controller. The naming conventions around Aries are not completely crystallised yet, so let’s define what I mean with each term.

ACA-py (aries-cloudagent-python) is the python application that interacts with other Aries agents. The controller is the application that interacts with the admin APIs of ACA-py. The application as a whole, consisting of the four services will be called issuer.

ACA-py will use a postgres database as a wallet backend, that means it stores the wallet data in the database. The issuer will use postgres as well, but it will not interact with the wallet data directly. Instead, it will have a separate database to store information, for example user information. Any interaction with the wallet from the controller will happen via ACA-py, and never directly.

The tails-server is required for issuing credentials that can be revoked. The tails-server will receive requests from ACA-py to store and download tails files. The only action the tails-server performs on the ledger is receiving the revocation registry definition.

Three of the services have external interactions. ACA-py and the tails-server are the two services that communicate with the ledger, the controller will not interact with the ledger. The controller receives requests for example from a browser. ACA-py receives requests from other Aries agents. The tails-server receives requests for the tails-files. The url you use for the --tails-server-base-url will be used in the revocation registry definition transactions in the ledger, so agents can download the tails-file to verify presentation proofs.

Architecture diagram of issuer

I included nginx as a reverse-proxy to expose the controller, ACA-py and the tails server.

ACA-py docker image

I have found three methods of creating a docker image for ACA-py.

The first method is to use the docker file provided by the aries-cloudagent-python repository. The docker folder contains docker files for the creation of images. You can build the image with:

1
2
3
$ git clone https://github.com/hyperledger/aries-cloudagent-python.git
$ cd aries-cloudagent-python
$ docker build -t acapy -f ./docker/Dockerfile.run .

You can then run the image as if you are running aca-py directly from the terminal:

1
$ docker run -it --rm acapy start --help

The benefit of using the provided docker file is that you do not have to create anything yourself. The image supports connecting to a postgres database as a wallet backend as well. If you want to run a different version of ACA-py, you can check out your desired version of the repository and build the exact version you want.

If you want a bit more control, you can use the second method, which is to modify the docker file provided by ACA-py repository. In the end you will probably end up with the same configuration in the file, but it allows you to add more tools if you need them.

The third method is to create a docker file from the ubuntu:18.04 base image yourself, which is what I did initially. The only requirement I have is that I should be able to use a postgres database as wallet storage backend. For this to work I created a checkout of both hyperledger/aries-cloudagent-python and hyperledger/indy-sdk as indy-sdk contains the support for libindy to use postgres. I could build libindy as well, but decided to go for a stable version installed with apt-get.

One more useful tool I added is the docker-compose-wait which allows you to wait for a port to be available before continuing. This is useful because ACA-py requires the database to be running in case you want to use postgres wallet storage.

The final docker file looks like:

acapy.dockerfile
 1
 2
 3
 4
 5
 6
 7
 8
 9
10
11
12
13
14
15
16
17
18
19
20
21
22
23
24
25
26
27
28
29
30
FROM ubuntu:18.04

RUN apt-get update && apt-get install -y gnupg2 \
    software-properties-common python3-pip cargo libzmq3-dev \
    libsodium-dev pkg-config libssl-dev curl
RUN apt-key adv --keyserver keyserver.ubuntu.com --recv-keys 68DB5E88 && \
    add-apt-repository "deb https://repo.sovrin.org/sdk/deb bionic master" && \
    apt-get update && \
    apt-get install -y libindy

# Build libindystrgpostgres.so for connecting to postgres
# requires cargo libzmq3-dev libsodium-dev pkg-config libssl-dev
ADD indy-sdk /indy-sdk
RUN cd /indy-sdk/experimental/plugins/postgres_storage && cargo build

# Install ACA-py
# requires python3-pip
ADD aries-cloudagent-python /aries-cloudagent-python
RUN cd /aries-cloudagent-python && \
    pip3 install -r requirements.indy.txt && \
    pip3 install --no-cache-dir -e .

# Add docker-compose-wait tool
ADD https://github.com/ufoscout/docker-compose-wait/releases/download/2.7.3/wait /wait
RUN chmod +x /wait

# Announce location of libindystrgpostgres.so
ENV LD_LIBRARY_PATH /indy-sdk/experimental/plugins/postgres_storage/target/debug

ENTRYPOINT ["/bin/bash", "-c", "/wait && aca-py \"$@\"", "--"]

Tails-server

The tails-server at github.com/bcgov/indy-tails-server can easily be incorporated in the set-up. After making a checkout you can build the image using:

1
2
3
$ git clone https://github.com/bcgov/indy-tails-server.git
$ cd ./indy-tails-server
$ docker build -t tails-server -f ./docker/Dockerfile.tails-server .

Postgres

The postgres database uses the default postgres docker image. I added a volume (-v ./postgres:/docker-entrypoint-initdb.d/) when creating a container which contains an initialisation script for creating a database for the controller.

ACA-py will create a database in postgres with the name you provide as --wallet-name, so make sure you do not choose a wallet name that is already a database in postgres. ACA-py will create the database when you run it with the provision argument, or when you run it with start and the --auto-provision parameter.

Controller

The controller is a basic docker file basic on the Go alpine image. The only extra tool it contains is the docker-compose-wait script to wait with starting the controller until ACA-py has started.

controller.dockerfile
 1
 2
 3
 4
 5
 6
 7
 8
 9
10
11
12
13
FROM golang:1.15-alpine

WORKDIR /go/src/controller/
COPY controller .

RUN go mod download
RUN go install .

# Add docker-compose-wait tool
ADD https://github.com/ufoscout/docker-compose-wait/releases/download/2.7.3/wait /wait
RUN chmod +x /wait

CMD /wait && controller

The next part in this series will discuss the functionality in the controller.

nginx & certbot

To expose the services to the outside world, I use nginx. I used this blog post as a source of inspiration for getting the easiest set up to work. The blog post provides a script called init-letsencrypt.sh which lets you easily set up an nginx container which serves the certbot certificate.

app.conf
 1
 2
 3
 4
 5
 6
 7
 8
 9
10
11
12
13
14
15
16
17
18
19
20
21
22
23
24
25
26
27
28
29
30
31
32
33
34
35
36
37
38
39
40
41
42
43
44
45
46
47
48
49
50
51
52
53
54
55
server {
    listen 80;
    server_name issuer.ldej.nl;
    location / {
        return 301 https://$host$request_uri;
    }
    location /.well-known/acme-challenge/ {
        root /var/www/certbot;
    }
}

server {
    listen 443 ssl;
    server_name issuer.ldej.nl;

    ssl_certificate /etc/letsencrypt/live/issuer.ldej.nl/fullchain.pem;
    ssl_certificate_key /etc/letsencrypt/live/issuer.ldej.nl/privkey.pem;

    include /etc/letsencrypt/options-ssl-nginx.conf;
    ssl_dhparam /etc/letsencrypt/ssl-dhparams.pem;

    location /api/ {
        proxy_pass http://controller:8080/api/;
    }
}

server {
    listen 8000 ssl;
    server_name issuer.ldej.nl;

    ssl_certificate /etc/letsencrypt/live/issuer.ldej.nl/fullchain.pem;
    ssl_certificate_key /etc/letsencrypt/live/issuer.ldej.nl/privkey.pem;

    include /etc/letsencrypt/options-ssl-nginx.conf;
    ssl_dhparam /etc/letsencrypt/ssl-dhparams.pem;

    location / {
        proxy_pass http://acapy:8000/;
    }
}

server {
    listen 6543 ssl;
    server_name issuer.ldej.nl;

    ssl_certificate /etc/letsencrypt/live/issuer.ldej.nl/fullchain.pem;
    ssl_certificate_key /etc/letsencrypt/live/issuer.ldej.nl/privkey.pem;

    include /etc/letsencrypt/options-ssl-nginx.conf;
    ssl_dhparam /etc/letsencrypt/ssl-dhparams.pem;

    location / {
        proxy_pass http://tails-server:6543/;
    }
}

docker-compose

I have defined the services in docker-compose files. The base docker-compose file contains:

docker-compose.yml
 1
 2
 3
 4
 5
 6
 7
 8
 9
10
11
12
13
14
15
16
17
18
19
20
21
22
23
24
25
26
27
28
29
30
31
32
33
34
35
36
37
38
39
40
41
42
43
44
45
46
47
48
49
50
51
52
53
54
55
56
57
58
59
60
61
62
63
64
65
66
67
68
69
70
71
72
73
74
75
76
77
78
79
80
81
82
83
version: '3'
services:
  acapy:
    image: ldej/acapy:latest
    depends_on:
      - db
    ports:
      - "${ACAPY_ADMIN_PORT}:${ACAPY_ADMIN_PORT}"
      - "${ACAPY_ENDPOINT_PORT}:${ACAPY_ENDPOINT_PORT}"
    environment:
      WAIT_HOSTS: "db:5432"
      WAIT_HOSTS_TIMEOUT: "300"
      WAIT_SLEEP_INTERVAL: "5"
      WAIT_HOST_CONNECT_TIMEOUT: "3"
    entrypoint: /bin/bash
    command: [
       "-c",
       "curl -d '{\"seed\":\"${AGENT_WALLET_SEED}\", \"role\":\"TRUST_ANCHOR\", \"alias\":\"${LABEL}\"}' -X POST ${LEDGER_URL}/register; \
        sleep 5; \
        /wait; \
        aca-py start \
        --auto-provision \
        -it http '0.0.0.0' ${ACAPY_ENDPOINT_PORT} \
        -ot http \
        --admin '0.0.0.0' ${ACAPY_ADMIN_PORT} \
        -e ${ACAPY_ENDPOINT_URL} \
        --webhook-url http://issuer:${CONTROLLER_PORT}/webhooks
        --wallet-type indy \
        --wallet-name ${WALLET_NAME}
        --wallet-key ${WALLET_KEY}
        --wallet-storage-type postgres_storage
        --wallet-storage-config '{\"url\":\"db:5432\",\"max_connections\":5}'
        --wallet-storage-creds '{\"account\":\"postgres\",\"password\":\"password\",\"admin_account\":\"postgres\",\"admin_password\":\"password\"}'
        --seed ${AGENT_WALLET_SEED} \
        --genesis-url ${LEDGER_URL}/genesis \
        --tails-server-base-url ${TAILS_SERVER_URL} \
        --label ${LABEL} \
        --auto-accept-invites \
        --admin-insecure-mode \
        --log-level info",
    ]

  db:
    image: postgres:latest
    hostname: db
    environment:
      POSTGRES_USER: postgres
      POSTGRES_PASSWORD: password
    volumes:
      - ./postgres:/docker-entrypoint-initdb.d/
      - ./.postgres:/var/lib/postgresql
    ports:
      - "5432:5432"

  controller:
    image: ldej/issuer:latest
    environment:
      ACAPY_ADMIN_PORT: "${ACAPY_ADMIN_PORT}"
      CONTROLLER_PORT: "${CONTROLLER_PORT}"
      WAIT_HOSTS: "acapy:${ACAPY_ADMIN_PORT}"
      WAIT_HOSTS_TIMEOUT: "300"
      WAIT_SLEEP_INTERVAL: "5"
      WAIT_HOST_CONNECT_TIMEOUT: "3"
    depends_on:
      - acapy
    ports:
      - "${CONTROLLER_PORT}:${CONTROLLER_PORT}"

  tails-server:
    image: ldej/tails-server:latest
    ports:
      - 6543:6543
    volumes:
      - /issuer/tails-files:/tails-files/
    environment:
      GENESIS_URL: "${LEDGER_URL}/genesis"
      TAILS_SERVER_URL: "${TAILS_SERVER_URL}"
    command: >
      tails-server
        --host 0.0.0.0
        --port 6543
        --storage-path /tails-files
        --log-level INFO      

As you can see on line 18, I try to register a DID based on a seed before ACA-py starts. I found this trick in the github.com/bcgov/indy-email-verification repository.

Most of this file is parameterized. I use a local .env file which is not part of the git repository which contains:

 1
 2
 3
 4
 5
 6
 7
 8
 9
10
AGENT_WALLET_SEED=<some-seed>
LABEL=issuer.ldej.nl
ACAPY_ENDPOINT_PORT=8000
ACAPY_ENDPOINT_URL=http://localhost:8000/
ACAPY_ADMIN_PORT=11000
LEDGER_URL=http://172.17.0.1:9000
TAILS_SERVER_URL=http://tails-server:6543
CONTROLLER_PORT=8080
WALLET_NAME=issuer
WALLET_KEY=<some-secret>

The most notable feature here is the LEDGER_URL. When I run the application locally, I do not connect to any of the hosted ledger, instead I connect to a locally running github.com/bcgov/von-network. The von-network browser is available on localhost:9000, but not within the docker network. Instead, you can connect to it by using the docker host IP address.

I also have a production environment file which contains publicly accessible URLs for ACAPY_ENDPOINT_URL, TAILS_SERVER_URL and http://test.bcovrin.vonx.io for LEDGER_URL.

When running the application locally, I override properties in the docker-compose file:

docker-compose.override.yml
 1
 2
 3
 4
 5
 6
 7
 8
 9
10
11
12
13
14
15
16
17
18
19
20
21
22
23
24
25
version: '3'
services:
  controller:
    build:
      context: .
      dockerfile: docker/controller.dockerfile
    volumes:
      - ./controller:/go/src/controller
    command: [
        "sh",
        "-c",
        "/wait && go run ."
    ]

  acapy:
    build:
      context: .
      dockerfile: ./docker/acapy.dockerfile

  tails-server:
    build:
      context: ./indy-tails-server
      dockerfile: ./docker/Dockerfile.tails-server
    volumes:
      - ./tails-files:/tails-files/

Mounting the Go code for the controller makes it so I don’t have to rebuild the controller when changing code.

The last docker-compose file is only required for production as that is where I want to start nginx and certbot:

docker-compose.prod.yaml
 1
 2
 3
 4
 5
 6
 7
 8
 9
10
11
12
13
14
15
16
17
18
19
20
21
22
23
version: '3'
services:
  nginx:
    image: nginx:1.15-alpine
    depends_on:
      - issuer
      - acapy
      - tails-server
    ports:
      - "80:80"
      - "443:443"
    volumes:
      - /issuer/nginx:/etc/nginx/conf.d
      - /issuer/certbot/conf:/etc/letsencrypt
      - /issuer/certbot/www:/var/www/certbot
    command: "/bin/sh -c 'while :; do sleep 6h & wait $${!}; nginx -s reload; done & nginx -g \"daemon off;\"'"

  certbot:
    image: certbot/certbot
    volumes:
      - /issuer/certbot/conf:/etc/letsencrypt
      - /issuer/certbot/www:/var/www/certbot
    entrypoint: "/bin/sh -c 'trap exit TERM; while :; do certbot renew; sleep 12h & wait $${!}; done;'"

Conclusion

And that is how you can develop your own controller, running all services in docker containers, and expose it to the internet using nginx. It took me more time than expected to get all the pieces to work together, but the final result is a good start for any controller.

In the next post I will dive deeper into the functionality of the controller.

Please let me know if this was useful or if you have any questions.